In this post we’ll take a deep dive through some of the keys concepts in the RoboBinding framework, by walking through a sample app.
The app we’ll create will be a simple greeting application that will ask the user for his/her sex, an appropriate salutation (based on the sex chosen) and their first and last names. Each input field will only become enabled once the previous field has been populated, and it will finish by displaying a greeting message that continues to update as the user edits their details.

The app we’ll create will be a simple greeting application that will ask the user for his/her sex, an appropriate salutation (based on the sex chosen) and their first and last names. Each input field will only become enabled once the previous field has been populated, and it will finish by displaying a greeting message that continues to update as the user edits their details.
Although this project is relatively simple and contrived, it will hopefully show how RoboBinding can help to keep our UI code untangled, easy to read and easy to test.
If you want to walk through this at the same time, you can download the preconfigured skeleton project here. Prerequisites for this tutorial are Eclipse, with the ADT and AJDT plugins installed.
Included in the skeleton project, we start with a fairly standard layout xml, defining the UI for our activity.
Let's start coding!
The two main components to familiarize yourself with when using RoboBinding are xml binding declarations and presentation models.
Via xml binding declarations, views can be bound to both properties and commands that are exposed by the presentation model. Properties represent some aspect of the view state that needs to be reflected in the view, commands are methods on the presentation model that can be invoked when the view handles a certain user input event.
Invoking Commands
To get started, let's consider the selection of either the male or female radio button. When either of these controls is clicked we want to invoke a particular command on our presentation model. Let’s create a new class called GreetingPresentationModel, and add two methods to it. We'll also need to add an @PresentationModel annotation above the class declaration.
We'll go into more detail about the @PresentationModel annotation later, in the meantime the methods (or commands) we created can now be mapped to from the view. We do this by first adding the RoboBinding namespace declaration to the root view of our layout xml:
We can then add the necessary binding attributes to each of our radio button declarations in the layout xml like so:
This is how we bind input events to presentation model commands with RoboBinding.
This is similar to the functionality provided by the android:onClick View attribute that comes out of the box, although RoboBinding provides much richer support for this kind of functionality. For example, as well as the onClick attribute there are many other attributes that you can bind with (depending on the view in question) such as onItemClick, onLongClick, onFocus etc. When defining your commands in code, you can also optionally specify an appropriate event class as the method parameter, such as ClickEvent, ItemClickEvent and so on. RoboBinding will create the necessary object and pass it to you. In our case we don’t need this information, so we can leave the maleSelected() and femaleSelected() methods parameter-less.
This is similar to the functionality provided by the android:onClick View attribute that comes out of the box, although RoboBinding provides much richer support for this kind of functionality. For example, as well as the onClick attribute there are many other attributes that you can bind with (depending on the view in question) such as onItemClick, onLongClick, onFocus etc. When defining your commands in code, you can also optionally specify an appropriate event class as the method parameter, such as ClickEvent, ItemClickEvent and so on. RoboBinding will create the necessary object and pass it to you. In our case we don’t need this information, so we can leave the maleSelected() and femaleSelected() methods parameter-less.
Returning to our app, it's time to implement the logic behind these two commands, which turns out to be straightforward:
Next we need to update our UI. Until a sex is chosen, we want the salutation spinner to be disabled. When a sex is chosen by the user, we want to enable the salutation spinner and populate it with the correct entries. Let's deal with enabling the spinner first.
Next we need to update our UI. Until a sex is chosen, we want the salutation spinner to be disabled. When a sex is chosen by the user, we want to enable the salutation spinner and populate it with the correct entries. Let's deal with enabling the spinner first.
Binding to a Property
How does the spinner know when it needs to be in the enabled/disabled state? We expose a property on our presentation model. How about salutationsSpinnerEnabled?
The new property is exposed by means of getter/setter methods. The logic is trivial.
Note that if we preferred, the same could have been achieved with the following:
This time we've added an @DependsOnStateOf annotation to the accessor method declaration. The @DependsOnStateOf annotation is an instruction to RoboBinding to notify any observers bound to a given property that they should refresh themselves when some other property on the presentation model is updated. In this case we want to refresh the state of the salutation spinner whenever the value of sex changes.
We can now tell our view to bind itself to this property. The enabled attribute controls the enabled state of a given view, so that's the one we want:
Let's review the way we bound to a property. You'll notice a couple of things here, firstly the curly braces around the property name in the view xml. These curly braces indicate that we are binding to a property on the presentation model, rather than a command. Any change to the value of that property on the presentation model will automatically propagate to the view.
The second thing you'll notice is that the properties on the presentation models themselves adhere to the Java Beans specification, whereby to bind to a property named salutationSpinnerEnabled, I should expect to find a public isSalutationSpinnerEnabled() accessor method available (or getSpinnerSalutationEnabled() if the property is non-boolean).
Whilst we're here, we also want to do the same for the firstname input field, starting in a disabled state and becoming enabled once a sex has been chosen. Let's add the necessary binding declarations to our layout xml and firstnameInputEnabled property to our presentation model.
Bringing it all together
There's still one more thing to do before we can start the app: configure the GreetingsActivity. We will use the GreetingsActivity to tell RoboBinding which views we want to bind to which presentation model. All that's required are a couple of lines in our onCreate() method:
We instantiate an instance of the presentation model and using the org.robobinding.binder.Binder class, tell RoboBinding which views we'd like to bind to it. Note we didn't have to make the normally obligatory setContentView() call in our Activity - RoboBinding does that for us. Let’s run the app.
If all went well, the app should run and when either male or female is selected, the salutations spinner becomes enabled. Let's add some values to that spinner.
Binding AdapterViews to data
Whilst you'll typically have one presentation model instance per screen/activity, if one of your views is composed of many smaller views (for example in a ListView or Spinner), then you will need to provide multiple child presentation models (one per row in the case of ListViews or Spinners).
RoboBinding will handle the instantiation and wiring of these child presentation models, all you have to do is configure your views and parent presentation model.
First off, there are two or three attributes that need to be specified in the layout xml.
The source attribute binds to a property on the presentation model that provides the underlying data. The itemLayout attribute determines the views to be used when presenting each row in the AdapterView (either by binding to a property on the presentation model that returns the relevant resource id, or by specifying the desired layout xml directly, as shown here). Since we're using a Spinner we also have to provide a dropdownLayout attribute, which works in the same way.
Let's see how the salutations property (bound to from the source attribute above) looks in the presentation model.
The return type of the getSalutations() accessor is a List of Salutation objects (it could also have been an array). Each index in the list will provide the data for the corresponding item in the AdapterView.
There are also two RoboBinding-related annotations here.
Once again the @DependsOnStateOf annotation tells RoboBinding that whenever there are changes to the sex property, we want to notify our view that the list of available salutations has changed.
The @ItemPresentationModel annotation is specific to AdapterView binding - it tells RoboBinding which class to instantiate to play the role of presentation model for each item in the AdapterView. Recall that we have already specified through our xml binding declarations which item views we want to display (through itemLayout and dropdownLayout); these views in turn will each need a presentation model to bind onto.
Let's have a look at the SalutationItemPresentationModel class.
Item presentation model classes need to implement the ItemPresentationModel interface, and should be parameterized to the corresponding data type of each item in the adapter (in our case Salutation). RoboBinding will inject the appropriate instance at each row index through the updateData() method.
As you can see, this presentation model exposes a salutation property. This is so the spinner_item.xml (we referenced from our Spinner itemLayout attribute) can bind onto it:
The spinner_dropdown_layout.xml is very similar, and will also be bound to the same presentation model.
Try running the app again to see this in action.
Before moving on, there is one final thing to do. In order to display our greeting message, the presentation model is going to need to know the currently selected salutation. We can add the onItemSelected attribute to our Spinner:
We'll then create the appropriate event handler on our presentation model:
We created an additional setter here, so that anyone interested in changes to the currently selected salutation can be notified. This will be needed by our greeting message.
Two-way binding
The next thing we need to do is enable the lastname input field when the firstname field contains content. This requires us to keep track of the state of the firstname. We can do this by setting up a two-way binding.
EditText widgets are one of the views that support two-way binding. With ordinary one-way binding, any changes to the presentation model are propagated to the view. With two-way binding, changes to the state of the view are additionally synchronized back to the presentation model.
The code needed on our presentation model will require nothing more than exposing a mutable property:
In our layout xml we will need to specify our two-way binding:
That ${...} notation on the text attribute (just like normal binding, but with a $ sign prepended) indicates that we want two-way binding. There's nothing else to do - changes to the view will now update our presentation model via the firstname setter. We can therefore now add some code to our presentation model to reflect the enabled state of the lastname input field, bind to it from our view, and we're almost done.
Since our greeting message is going to need to access the lastname, we can set up two-way binding for this property in the same way we did for firstname. Go ahead and do that now.
Greetings!
The final piece in the puzzle involves exposing a greeting property. If the lastname has not yet been filled we can display a default placeholder, otherwise we can show our greeting message.
This time our greeting property will need to change whenever salutation, firstname or lastname change, so we list those in our @DependsOnStateOf annotation.
The last thing to do is update our view to bind to the greeting property, and we're finished.
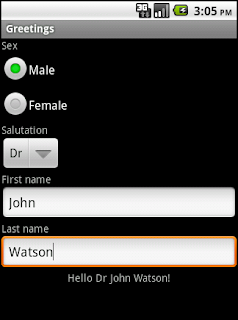
Run the app to make sure everything is working. If you think you missed anything, you can check the working source code for this project here.
Wrapping up
If you take a look at your final presentation model, you'll see that the code portrays a distilled representation of the view logic and state. The method names give us direction and the code within each method is at most a handful of lines, making it easy to understand what's going on.
You'll also notice both zero dependence on Android UI classes and the fact that our presentation model class can be a simple POJO, meaning the code is decoupled and easy to test.
Compare this with the code we would have likely written without RoboBinding. The code is twice as long, it's polluted with unnecessary setup code and in some cases even the code we want to get to and change is buried beneath all the required wiring.
How many times have you seen code like this in your application?
Overlooking the fact that this code might well wrap or extend off your screen, ask yourself - how many of the 15 lines above are actually adding value?
This is where RoboBinding can help.
That's it for this blog post - I hope you found it useful and had fun trying out RoboBinding. If you have any comments or feedback please let me know.
Reference
Presentation Model by Martin Fowler
Presentation Patterns – Presentation Model by Paul Williams